This is a repost of an article from Tutornix about installing FerretDB on Ubuntu; we are grateful to the author for the permission to repost this on our blog.
Welcome to this guide on how to install FerretDB on Ubuntu. But before we dive into the nub of this matter, we need to know what FerretDB is!
Databases are majorly categorised as Relational and Non-relational. Today, our key focus is on non-relational databases (also known as NoSQL). These databases do not observe the traditional tabular relational database model of rows and columns with pre-defined schemas, but instead use a variety of data models, such as key-value, document, column-family, and graph models, to store and manage data.
They are often used to store and manage unstructured or semi-structured data, such as text, images, videos, social media posts, and sensor data, that may not fit well into traditional relational databases. They are known for better scalability, performance, and availability than traditional relational databases, particularly for web-scale applications with high volumes of data and traffic. The most popular NoSQL databases are MongoDB, Redis, Couchbase, Cassandra, Neo4j etc.
FerretDB is a free and open-source alternative to MongoDB, built on Postgres. It translates the MongoDB wire protocol queries to SQL, and uses PostgreSQL as the database engine. FerretDB was introduced after the popular MongoDB deviated from its open-source roots and switched to the SSPL license. It acts as a drop-in replacement for MongoDB users looking for an open-source alternative to MongoDB.
One of the amazing features is that FerretDB is compatible with MongoDB drivers and can serve as a direct replacement for MongoDB 6.0+. It is cross-platform as it can be installed on Linux, macOS and Windows systems. There is also a Docker image for those who want to spin it in containers.
To run FerretDB in Docker containers, follow the guide below:
Now let's plunge in!
Step 1 – Install and Configure PostgreSQL on Ubuntu
FerretDB uses PostgreSQL as the database engine. For that reason, we need to install it on our system.
Before we begin, you need to ensure that your system and all the installed packages are updated to their latest stable versions:
sudo apt update
sudo apt upgrade
Once the system has been updated, install PostgreSQL:
sudo apt install postgresql -y
After installing, ensure that the service is runnning:
$ systemctl status postgresql
● postgresql.service - PostgreSQL RDBMS
     Loaded: loaded (/lib/systemd/system/postgresql.service; enabled; vendor preset: enabled)
     Active: active (exited) since Fri 2023-04-14 18:23:20 EAT; 1min 7s ago
    Process: 4519 ExecStart=/bin/true (code=exited, status=0/SUCCESS)
   Main PID: 4519 (code=exited, status=0/SUCCESS)
        CPU: 1ms
....
Connect to the instance:
sudo -u postgres psql
Create the FerretDB user:
CREATE USER ferretuser WITH PASSWORD 'Passw0rd!';
Create a database for the user:
CREATE DATABASE ferretuser OWNER ferretuser;
Once created, exit the shell:
\q
Create the user on your system:
sudo adduser ferretuser
Verify if you can connect to the database using the user:
$ sudo -u ferretuser psql
could not change directory to "/home/ubuntu22": Permission denied
psql (14.7 (Ubuntu 14.7-0ubuntu0.22.04.1))
Type "help" for help.

ferretuser=> \q
Step 2 – Download and Install FerretDB on Ubuntu
To download the latest FerretDB release, visit the official GitHub Release page.
Alternatively, you can pull the latest release using the command:
VER=v1.2.0
wget https://github.com/FerretDB/FerretDB/releases/download/$VER/ferretdb.deb
The blog post was written when the latest version of FerretDB was v1.2.0. You can check the latest version here. We've also addressed the issue with version fields for .deb packages which were not accurately reflecting the correct versions during installation, as seen in the sample output for the command below.
Once downloaded, install FerretDB using the command:
sudo apt install ./ferretdb.deb
Sample Output:
Reading package lists... Done
Building dependency tree
Reading state information... Done
Note, selecting 'ferretdb' instead of './ferretdb.deb'
The following package was automatically installed and is no longer required:
  gir1.2-goa-1.0
Use 'sudo apt autoremove' to remove it.
The following NEW packages will be installed:
  ferretdb
0 upgraded, 1 newly installed, 0 to remove and 95 not upgraded.
Need to get 0 B/15.1 MB of archives.
After this operation, 30.1 MB of additional disk space will be used.
Get:1 /home/ubuntu/ferretdb.deb ferretdb amd64 0.0.0~rc0 [15.1 MB]
Selecting previously unselected package ferretdb.
(Reading database ... 234140 files and directories currently installed.)
Preparing to unpack /home/ubuntu/ferretdb.deb ...
Unpacking ferretdb (0.0.0~rc0) ...
Setting up ferretdb (0.0.0~rc0) ...
Check the installed version:
$ ferretdb --version
version: v1.2.0
commit: 3153c8fbf185126af1fe8fb364ac166d2287d093
branch: unknown
dirty: true
package: deb
debugBuild: false
Step 3 – Start and Enable FerretDB on Ubuntu
FerretDB takes several arguments that include:
  -h, --help                                                   Show context-sensitive help.
      --version                                                Print version to stdout and exit.
      --handler="pg"                                           Backend handler: 'pg', 'sqlite', 'tigris' ($FERRETDB_HANDLER).
      --mode="normal"                                          Operation mode: 'normal', 'proxy', 'diff-normal', 'diff-proxy' ($FERRETDB_MODE).
      --state-dir="."                                          Process state directory ($FERRETDB_STATE_DIR).
      --listen-addr="127.0.0.1:27017"                          Listen TCP address ($FERRETDB_LISTEN_ADDR).
      --listen-unix=""                                         Listen Unix domain socket path ($FERRETDB_LISTEN_UNIX).
      --listen-tls=""                                          Listen TLS address ($FERRETDB_LISTEN_TLS).
      --listen-tls-cert-file=""                                TLS cert file path ($FERRETDB_LISTEN_TLS_CERT_FILE).
      --listen-tls-key-file=""                                 TLS key file path ($FERRETDB_LISTEN_TLS_KEY_FILE).
      --listen-tls-ca-file=""                                  TLS CA file path ($FERRETDB_LISTEN_TLS_CA_FILE).
      --proxy-addr=""                                          Proxy address ($FERRETDB_PROXY_ADDR).
      --debug-addr="127.0.0.1:8088"                            Listen address for HTTP handlers for metrics, pprof, etc ($FERRETDB_DEBUG_ADDR).
      --postgresql-url="postgres://127.0.0.1:5432/ferretdb"    PostgreSQL URL for 'pg' handler ($FERRETDB_POSTGRESQL_URL).
Since FerretDB has not been started, we will create a systemd service file with all the desired variables:
sudo vim /etc/systemd/system/ferretdb.service
In the file, add the below lines
[Unit]
Description=FerretDB
After=network-online.target

[Service]
Type=simple
ExecStart=/bin/bash -c "ferretdb --mode="normal" --listen-addr="127.0.0.1:27017" --postgresql-url='postgres://ferretuser:Passw0rd!@127.0.0.1:5432/ferretuser'"
Restart=always
RestartSec=2
TimeoutStopSec=5
SyslogIdentifier=ferretdb

[Install]
WantedBy=multi-user.target
In the above command, remember to replace the credentials for PostgreSQL before you proceed with the below command to reload the system daemon:
sudo systemctl daemon-reload
Start and enable the service:
sudo systemctl enable ferretdb
sudo systemctl start ferretdb
Check the status of the service:
$ systemctl status ferretdb
●  ferretdb.service - FerretDB
     Loaded: loaded (/etc/systemd/system/ferretdb.service; enabled; vendor preset: enabled)
     Active: active (running) since Fri 2023-04-14 18:35:07 EAT; 5s ago
   Main PID: 9424 (ferretdb)
      Tasks: 7 (limit: 4629)
     Memory: 3.9M
        CPU: 10ms
     CGroup: /system.slice/ferretdb.service
             └─9424 ferretdb --mode=normal --listen-addr=127.0.0.1:27017 "--postgresql-url=postgres://ferretuser:Passw0rd!@127.0.0.1:5432/ferretuser"

Apr 14 18:35:07 tutornix.lab systemd[1]: Started FerretDB.
Apr 14 18:35:07 tutornix.lab ferretdb[9424]: 2023-04-14T18:35:07.544+0300        INFO        ferretdb/main.go:231        Starting FerretDB v1.0.0...        {"version": "v1.0.0", "commit": ">
Apr 14 18:35:07 tutornix.lab ferretdb[9424]: 2023-04-14T18:35:07.545+0300        INFO        listener        clientconn/listener.go:95        Listening on TCP 127.0.0.1:27017 ...
Apr 14 18:35:07 tutornix.lab ferretdb[9424]: 2023-04-14T18:35:07.545+0300        INFO        listener        clientconn/listener.go:183        Waiting for all connections to stop...
Apr 14 18:35:07 tutornix.lab ferretdb[9424]: 2023-04-14T18:35:07.546+0300        INFO        debug        debug/debug.go:95        Starting debug server on http://127.0.0.1:8088/
Step 4 – Use FerretDB on Ubuntu
Once installed and started, FerretDB can be used just like MongoDB. You can connect to it using the Mongo shell.
You need to have the Mongo Shell installed on your system before you proceed. First, add the MongoDB repo to your system.
sudo apt install wget curl gnupg2 software-properties-common apt-transport-https ca-certificates lsb-release -y
curl -fsSL https://www.mongodb.org/static/pgp/server-6.0.asc|sudo gpg --dearmor -o /etc/apt/trusted.gpg.d/mongodb-6.gpg
echo "deb [ arch=amd64,arm64 ] https://repo.mongodb.org/apt/ubuntu $(lsb_release -cs)/mongodb-org/6.0 multiverse" | sudo tee /etc/apt/sources.list.d/mongodb-org-6.0.list
Install the Mongo Shell on Ubuntu:
sudo apt update && sudo apt install mongodb-mongosh
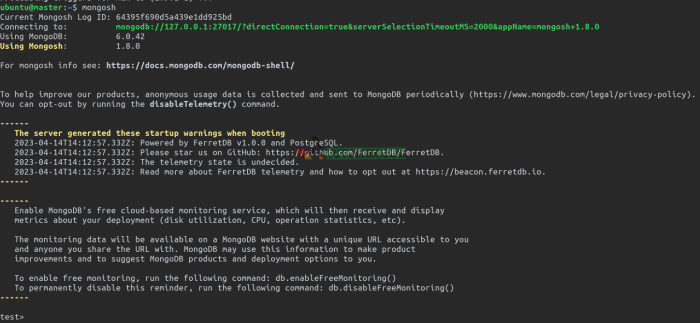
Now connect the FerretDB:
mongosh
Sample Output:
Once connected, switch the context to ferretuser:
Please note that the use <name> command does NOT create a database.
Instead, it switches the context from the current database to a non-existing database.
In the example below, ferretuser will not be visible when you run show dbs since no data has been inserted; the database is created ONLY when you first insert data into it.
test> use ferretuser
switched to db ferretuser
ferretuser> show dbs
public  0 B
ferretuser>
Add a document to the database (this will now create the database on the fly):
db.userdetails.insertOne({
  F_Name: 'Tutornix',
  L_NAME: 'Home',
  ID_NO: '124345',
  AGE: '70',
  TEL: '25465445642'
})
View the added database and collections:
ferretuser> show dbs
ferretuser   32.00 KiB
public       0 B
ferretuser>
> show collections
userdetails
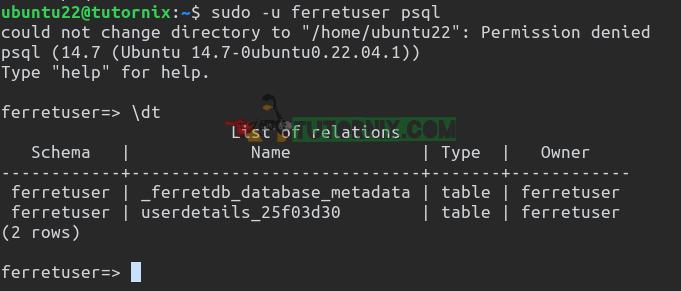
This added table can also be viewed on the PostgreSQL database:
sudo -u ferretuser psql
Now view if the tables exist here too:
Verdict
That marks the end of this amazing guide on how to install FerretDB on Ubuntu. You can now enjoy the awesomeness of FerretDB, a free and open-source alternative to MongoDB. I hope this was helpful.
If you would like to publish an article on FerretDB, we welcome all contributions to FerretDB, including blog posts. You can also contribute to the development of FerretDB, or submit bug reports, and feature requests. Please reach out to us on our community channels if you have any questions or feedback.